How to use GitHub October 14, 2018
- Difficulty: Medium
- Time: 1 hour
- Prerequisite: Basic knowledge of Git
Table of contents
- 1. Install Git
- 2. Create a GitHub account
- 3. Setup your SSH key
- 4. Clone the project
- 5. Create a new branch
- 6. Commit often
- 7. Push
- 8. Create a pull request
So you want to use GitHub? Or maybe you have to, because it's your company's main repository. In any case, in this article I'll go in details on how to do just that, from the very beginning all the way to your first code contribution.
GitHub is not the only Git repository out there. The alternatives (BitBucket, GitLab, etc.) are also good options and you should compare the pros and cons of each before finalizing your choice. While this article will focus on GitHub, most of the steps apply to all Git repositories.
1. Install Git
First things first, if you want to use Git, you'll need it on your workstation. Head over to Git's download page and download the installer. Once the installer has finished downloading, simply run it and follow the instructions.
1.1 Windows
As Git is mainly a command-line tool, its installation can feel trickier on Windows. Luckily for Windows users, Git provides a neat installer to do all the work. Still, there are quite a few choices to make during the process and they came seems daunting at first. Let me walk you through the steps of the installer.
- Select components screen
- Recommended
- Git LFS (Large File Support)
- Associate
.gitconfiguration files with the default text editor - Associate
.shfiles to be run with the Bash
- Optional
- Windows Explorer integration: Useful if you don't like to navigate via the command line (using
cdcommands), this will add two options in the right-click menu of a folder to open the Git console and GUI.
- Windows Explorer integration: Useful if you don't like to navigate via the command line (using
- Recommended

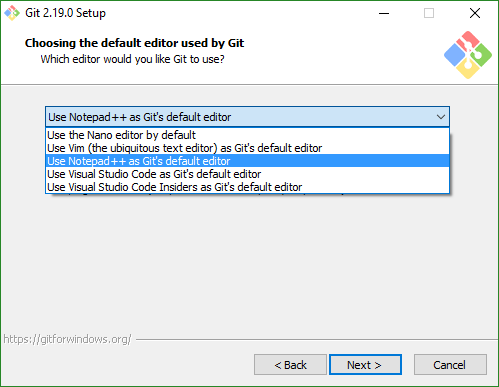
- Choosing the default editor used by Git screen
- Notepad++: If you don't have it already, you can download it from their download page.
- Adjusting your PATH environment screen
- Use Git from Git Bash only: This is the recommended option and should be the one you choose. Consider the other options only if you really require them. If you're unsure, you don't require them.

- Choosing HTTPS transport backend screen
- Use the OpenSSL library: unless your organization requires you to use the Windows Secure Channel library, the default is recommended.
- Configuring the line ending conversions, screen
- Checkout Windows-style, commit Unix-style line endings: This is the option that will give you the least amount of trouble, so I recommend it. Unless you configure your code editor to properly manage Unix-style line endings, having Windows-style line endings will make your life easier. Whatever you do, do not choose Checkout as-is commit as-is, especially if you have team members working on Unix systems (lots of open source contributors use Unix systems).
- Configuring the terminal emulator to use with Git Bash screen
- Use MinTTY: The default works perfectly fine. Compared to Windows bash, it handles non-Unicode characters better and has colours (who doesn't like colours?).
- Configuring extra options screen
- Recommended
- Enable file system caching
- Enable Git Credential Manager
- Optional
- Enable symbolic links: If you're on Windows, chances are you're not using these very much. Not required.
- Recommended
2. Create a GitHub account
Now that you have Git installed on your local computer, it's time to create a GitHub account! Fill the sign-up form on their website. You may need to validate your email address to finish the registration process.
https://yourCompany.github.com/join. Ask your colleagues for the exact URL.2.1 Join an organization
Organizations are groups of users (people) along with the repositories (projects) they contribute to. They are a common and convenient way to manage permissions and roles in a consistent manner across multiple projects. For example, if you look at the CakePHP organization, you will see that a team of about 40 contributors works on upwards of 60 repositories. They use the organization as a way to white-list people that have write permission on the important branches of their projects, such as the main development branch, the current release branch, etc.
If you want to contribute to projects inside an organization, make sure to request access to their administrator. This may not apply to you for now, but it might sooner than you think!
3. Setup your SSH key
You're signed-up, your email address has been validated and you're ready to code! Well, almost. There are two ways to work with Git: using HTTPS and using SSH. HTTPS is very convenient in that is doesn't require any additional setup and you could start working right away. The downside is that in order to authenticate you, GitHub will ask you for your credentials (username and password) again and again and again... To avoid this, I therefore recommend using SSH. To do so, you will need to generate a special signature unique to your workstation, your SSH key, and give it to GitHub so it knows it's you. Git will then automatically provide this key to GitHub every time you would need to authenticate, all on its own.
Follow the steps of the GitHub's SSH key setup guide and come back here when you're all done.
4. Clone the project
Alright, ready? Let's copy the source code of the project on your workstation! Actually, we'll do more than that: we will copy the entire repository, which consists of the source code AND all of its previous revisions, on your workstation! This is because, as opposed to other versioning system such as SVN, Git is completely decentralized. Every copy of the repository IS the full repository, meaning that even if the "master" copy on GitHub disappears, nothing is lost. To clone a project, follow these steps:
- Navigate to the project you want to clone in GitHub
- Click the green "Clone or download" button
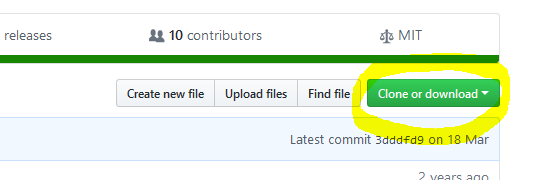
- Make sure the pop-up says "Clone with SSH". If it doesn't click the "Use SSH" link at the top-right of the pop-up

- Copy the string provided. It should start with
git@ - Open your Git command-line or terminal
- Using
cdcommands, navigate to where you want to project's folder to be cloned to- Example: if you want the project to be in
C:\workspace\java\<project>, navigate toC:\workspace\java
- Example: if you want the project to be in
- Type
git clonefollowed by the string you copied from GitHub and press Enter- If this is the first project you clone from GitHub, you will receive a warning about the fact that the authenticity of the host cannot be established. Verify that the host is in fact GitHub, and then press y, e, s, Enter
Git will then clone the repository to a folder with the same name as the project. The complete console log should look like this:
$ git clone git@github.com:<organization>/<project>.git
Cloning into '<project>'...
The authenticity of host 'github.com (192.30.253.113)' can't be established.
RSA key fingerprint is SHA256:<some long random-looking string>.
Are you sure you want to continue connecting (yes/no)? yes
Warning: Permanently added 'github.com,192.30.253.113' (RSA) to the list of known hosts.
remote: Enumerating objects: 1, done.
remote: Counting objects: 100% (1/1), done.
remote: Total 1366 (delta 0), reused 0 (delta 0), pack-reused 1365
Receiving objects: 100% (1366/1366), 18.71 MiB | 5.79 MiB/s, done.
Resolving deltas: 100% (975/975), done.
Checking connectivity... done.
$ cd <project>
4.1 Fork the project
If you work on someone else's project, it is usually preferable to fork it before cloning it. Forking a project will simply copy the repository under your own namespace. It's a good idea to do so because it gives you your own copy of the project with which you can do as you please. It also has the benefit of restraining any screw-ups that might happen in your own copy, without any consequence to the main one.
To fork a project, simply navigate to the project's page on GitHub and click the "Fork" button (near the top-right), then select the namespace you want to fork it into (normally, your username's).

Once you've forked the project, you can clone it as detailed in step 4 above. Then, proceed to step 4.2: Add a remote.
4.2 Add a remote
A remote is a link between your local version of the repository and a fork that isn't your own. For example, if you forked the main repository into your own namespace and then cloned that fork, you should add the main repository as a remote to be able to stay up-to-date with the changes happening there. To add a remote to your local repository, run the following command:
$ git remote add --track <main branch on remote> <local name of remote> git@github.com:<organization>/<project>.gitWhere:
<main branch on remote>is the name of the branch you wish to track locally. Must exist in the parent repository.<local name of remote>is the name you are going to give to the parent repository on your workstation. It's entirely up to you. I like to useupstreamfor the main remote.git@github.com:<organization>/<project>.gitis the string you would use to clone the parent repository (from the green "Clone or download" button)
*For more information, see Git's documentation on remotes.
Example:
$ git remote add --track master upstream git@github.com:<organization>/<project>.git
$ git remote
origin
upstream
5. Create a new branch
Working in a branch separate from the main one helps keeping things clean and organized. It also helps to easily be able to go back to a stable version of the code. When using feature-branches with Git, a new branch should be created for every single change you wish to make, no matter how small. To create a new branch, follow these steps:
- Make sure your local repository is up-to-date
- If you work directly on the main repository, simply run:
git fetch --allto get any new changes from the main repository you might not have locallygit checkout origin/masterto jump to the latest stable commit
- If you work in your own fork, run:
git fetch --allto get any new changes from the main repository you might not have locallygit checkout masterto go to your main local branchgit rebase upstream/masterto apply the changes from the main repository to your local one
- If you work directly on the main repository, simply run:
- Create a new branch using the
git checkout -b <new branch name>command - Code!
You may use a different branch than master as your main local branch and a different remote name than upstream for the main repository. If so, adapt the commands accordingly.
6. Commit often
Committing changes into Git is akin to pressing the "Save" button in a text editor: you should do it all the time. It's almost impossible to lose work once it's been committed into Git. So, since you don't want to lose work, commit often! Don't worry about messy commits: you can always amend the last commit to fix it later or even squash multiple commits together to tidy it up. Don't let that hinder you from committing often. To commit changes into Git, simply follow these instructions:
- Open your Git command-line or terminal
- Using
cdcommands, navigate to your project's folder - Run the
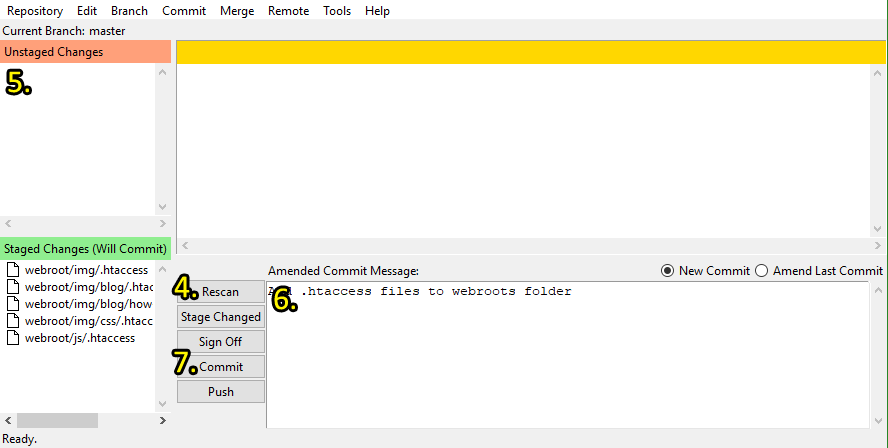
git guicommand - Click the "Rescan" button to allow the UI to pick-up your latest changes
- Stage the changes you want to commit from the top-left pane to the bottom-left pane by selecting them and pressing Ctrl+t
- You can Ctrl+click or Shift+click the files
- Write a clear and concise commit message on the first line, leaving the details to the next lines if required
- Press the "Commit" button
Keep the first line of the commit message short. The first line of the commit message should be clear, concise and to-the-point. You should think of it as the newspaper headline of the change set. The main reason for this is that most ways of viewing Git commits will only show the first line of the commit message and, even then, will cut it off after 80 characters or so. To keep it short, don't write about how you did the changes, but what you did, functionally. You can always go into more details in the following lines. If you don't know how to phrase your commit messages, simply write a short imperative statement as if ordering the commit itself to change the code, for example: "Change the maximum width of the username to 120 characters".
Don't commit formatting changes with functional changes. Going through a change log is hard enough as it is, going through one where mundane spacing changes are mixed up with functional code changes really isn't a pleasant experience. If you like the person that will have to look at your commits in the future, aka future-you, don't mix the two together!
Use the .gitignore file to avoid committing environment specific files or artifacts. Usually, environment specific files are not committed to the repository. This includes IDE project files, the Mac-specific .DS_Store file, etc. The reason for that is simple: not everyone might use the same environment you do! As for build artifacts, they are also usually excluded as everyone contributing to the project should compile their own. As such, they just take space in the repository.
6.1 Rebase often
If you work on a project as a member of a team, changes will constantly be merged into the main repository while you're working on yours. If you wait too long before syncing your local repository with the changes from the main repository, the code you're working on might end-up needing some serious adjustments or could even not be required anymore! To keep up with the changes, I recommend rebasing at least daily, depending on the size of your team and the frequency at which changes are merged into the main repository. To rebase, run:
git fetch --allgit rebase upstream/master- Fix the resulting conflicts, if any
Conflict resolution is a subject worthy of its own article. As such, I won't be discussing it here.
There is an alternative to rebasing: merging. I personally dislike it as it tends to make it more difficult to discern what happened when and before what. Multiple merges also tend to accumulate in long-lived branches, creating a rainbow of incoming branches that is even harder to decipher. Either way, rebase or merge, there is no way to avoid merge conflicts.
7. Push
Once your changes are ready, you can send them to GitHub using the push command. This will update the repository on GitHub with the changes that are currently only in your local repository. To push, simply run the git push command. If this is the first time you're pushing the branch, Git will let you know that you have to add some flags to the command. Copy the command given by Git and push your changes. The complete console log should look like this:
$ git push
fatal: The current branch <branch name> has no upstream branch.
To push the current branch and set the remote as upstream, use

    git push --set-upstream origin <branch name>

$ git push --set-upstream origin <branch name>
Total 0 (delta 0), reused 0 (delta 0)
To git@github.com:<organization>/<project>.git
 * [new branch]      <branch name> -> <branch name>
Branch <branch name> set up to track remote branch <branch name> from origin.
8. Create a pull request
You've done it: you've created a new change set in a branch! Ready to request to the repository administrator to take your contribution? Alright, first of all, head to GitHub and navigate your way to the main repository's page. Next, you will see a new yellow alert that wasn't there before. It will look like this:

If you forked the repository, you should still go to the main repository's page to create your pull request. GitHub will know you pushed your changes into a fork and will also know that you'll want them merged into the main repository. Therefore, the steps don't change, even if you forked!
Click the "Compare & pull request" button. This will bring you the pull request submission form. That form is divided into different parts:
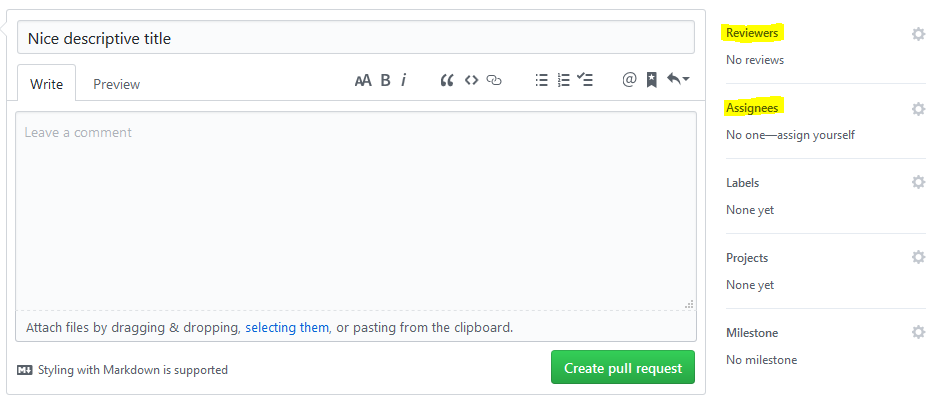
Let's take a look at them. At the top is the title of your pull request. Keep in mind the tips shared above about the first line of the commit message: the pull request title should respect those too. Once that's filled out, it's a good idea to describe what you did, at a high level, into the comment field. Add any important details you can think of and also any links to issues or tickets fixed or impacted by your pull request. Having cross-references make it much easier to go back and track the reason why certain changes happened.
Then there's the right sidebar. Its first section is to request reviews. I recommend all pull requests to be reviewed. By whom? Well that depends, but a good rule of thumb should be to assign pull requests to people that are intimately familiar with the area of the code you changed. They are the ones that will be able to make the most insightful comments about your changes. Those experts will also be able to tell you if you broke some fundamental assumption of the code that you might not have known about. In any case, always having at least one review never hurts. The second section is about the assignee. That person is the one that is responsible to formally accept your pull request into the repository. When you've filled everything, finish by clicking the green "Create pull request" button.
If you work on your own personal projects, there won't be a reviewer or an assignee. You may also want to skip on the pull request step altogether. However, knowing how it's done when multiple people are involved is never a bad idea, because sooner or later you might contribute to a larger project.
Depending on the repository, the branch in which change sets should be merged in may vary. You can choose which branch you want your pull request merged in when you create it. If you're unsure, ask the repository administrator.
There you go, you got through it all! Through this tutorial we've seen how to get the code base of a project from GitHub to your computer, how to stay up-to-date with the other contributors and finally, how to push your changes back to the master repository. Feel free to come back this page if need be: the commands never change and having a reference sheet is always handy. There is much more to learn about Git and GitHub but for now: go on and contribute!
Git Tutorial
Last updated on August 7, 2019
— Etienne Lamoureux